Getting Started
In this section, we’ll guide you through the basics of setting up Branchlate in your project, integrating with your Git workflow, and syncing your translation keys.
By the end of this guide, you’ll have your project connected to Branchlate and be able to sync translations directly from your codebase.
1. Prerequisites
Before you begin, make sure you have the following tools ready:
- Node.js: Version v20 or later.
- Git: Installed and set up. Ensure you have a Git-ready repository to work from.
- Branchlate Account: If you don’t have one yet, sign up at app.branchlate.com.
You will also need to make sure your translation files are in a JSON format (e.g., i18n/en.json, i18n/fr.json).
To make sure you always run the latest version of Branchlate, all commands use npx branchlate@latest.
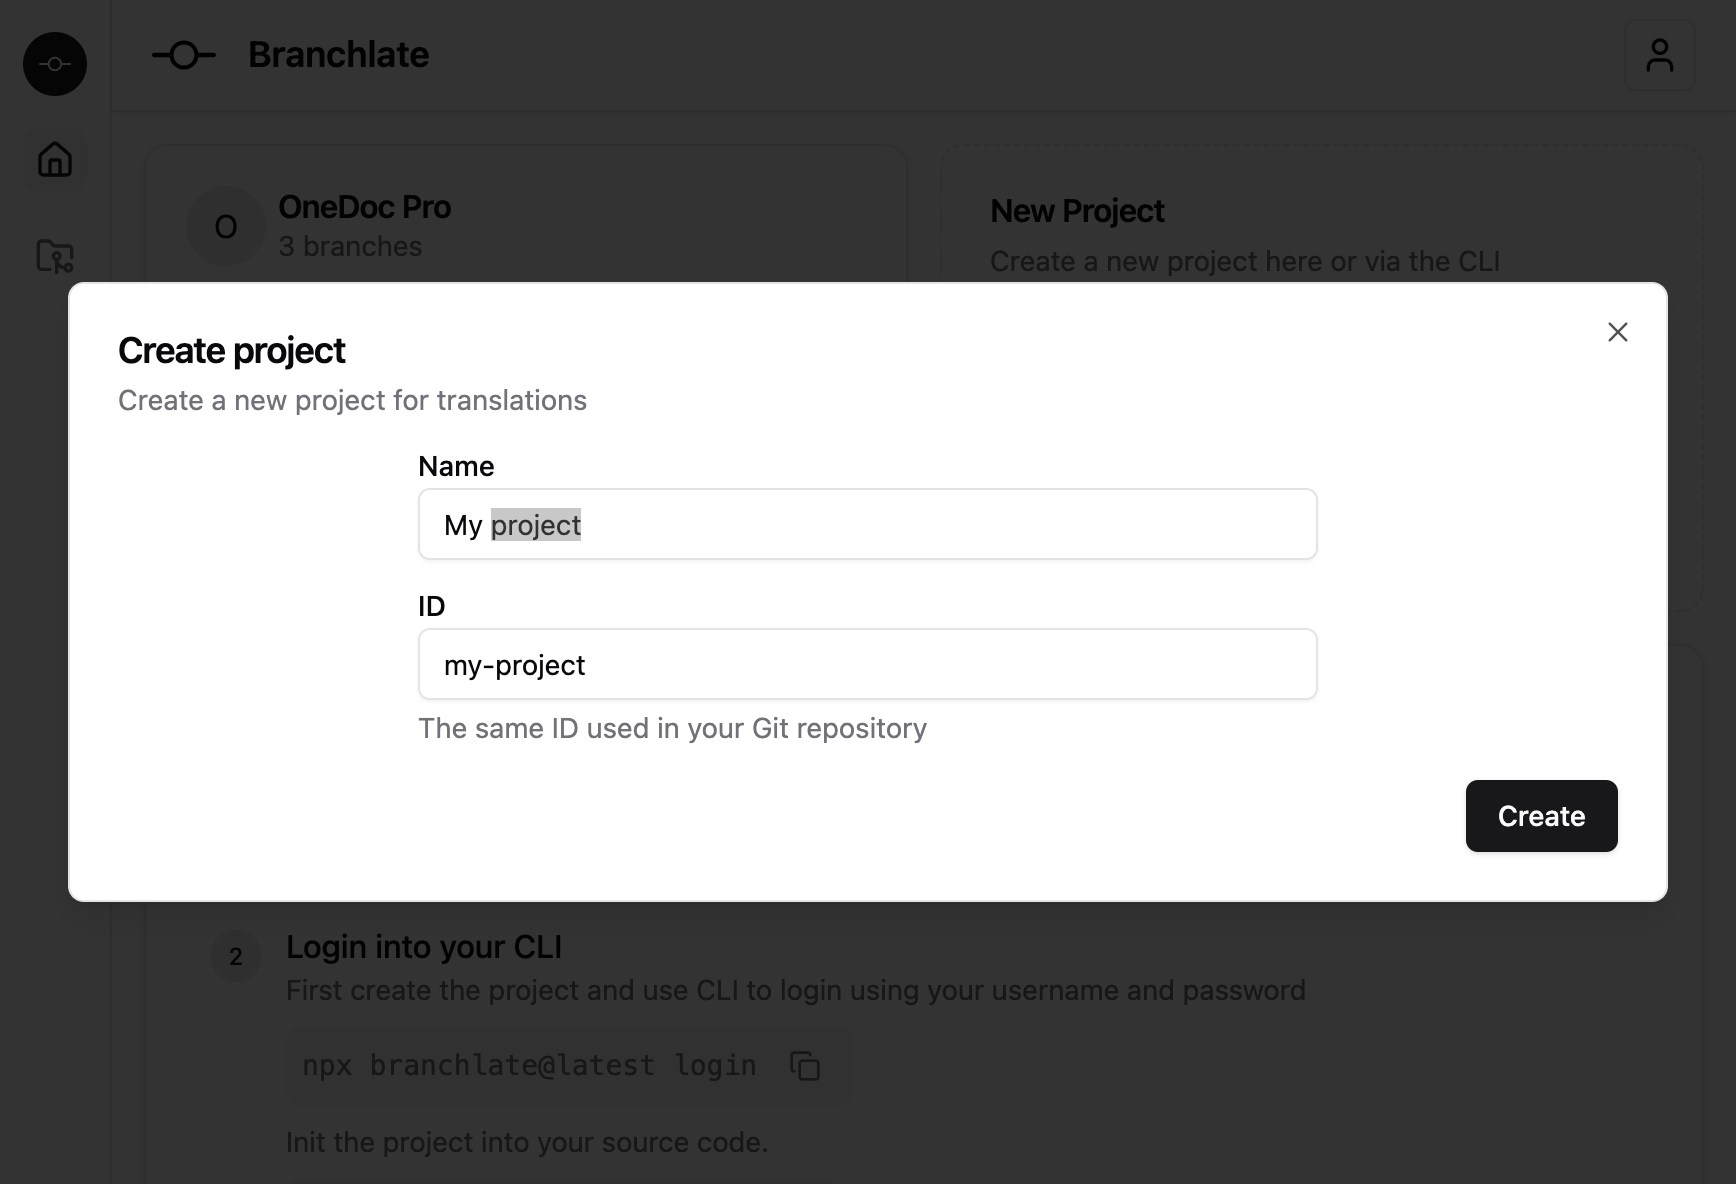
2. Create your project
To start using Branchlate, the first step is to create a new project on the Branchlate UI. This project will serve as the foundation for syncing your translations across different branches.
Here’s how to create a project:
- Go to the Dashboard in the Branchlate UI.
- Click on the Create Project button.
- Enter your project’s name and ID.
That's it! Now your project is ready to sync with your codebase.
You can find your project ID in the Branchlate Dashboard. You’ll need this ID when linking your local repository to Branchlate.
3. Set up your code source
Branchlate integrates directly with your project’s translation files, enabling seamless management of translations. If your project already contains translation JSON files (e.g., i18n/en.json, i18n/fr.json), Branchlate will handle the syncing process automatically.
The next step is to log in to the CLI and connect your project.
3.1 Login to Branchlate
First, log in to Branchlate via the CLI to authenticate your session with npx branchlate@latest login:
$ npx branchlate@latest login
✔ Enter your email: … admin@acme.com
✔ Enter your password: … ************
Authentication successful and data stored.
Branchlate will save your authentication token locally in ~/.branchlate/authentication.json, so you won’t need to log in every time.
3.2 Initialize your project
Now that you’re authenticated, initialize your project in your local repository with npx branchlate@latest init:
$ npx branchlate@latest init
✔ Branchlate project id … project-id
✔ Branchlate organization id (press enter for "personal") … your-organisation
✔ Where are your translation files stored? (e.g., i18n/{languageCode}.json) … i18n/{languageCode}.json
Configuration saved to branchlate.json
- Project ID: The unique identifier for your project that you created in the Branchlate UI.
- Organization ID: Use your organization ID if you're working within a team, or leave this blank for personal use.
- Translation Files Path: Specify the path where your JSON translation files are stored (e.g.,
i18n/{languageCode}.json). The{languageCode}placeholder will be replaced with ISO standard codes likeen,fr, or more specific codes likeen-GB,fr-CH(see ISO codes).
Make sure your translation files follow a consistent path structure for easier syncing.
If you want to restrict the file extensions that can be pushed to the server, you can add the allowedFileExtensions key to the branchlate.json file. For example, to allow only JSON files, add the following configuration:
{
  "allowedFileExtensions": ["json"]
}
4. Syncing your translations
With your project initialized, it’s time to sync your translation keys for the first time. This process involves pushing the translation keys from your local JSON files to Branchlate, which can then be reviewed or updated by your team.
For example, if you’re working on a branch called new-feature, you can sync it by running the following command with npx branchlate@latest sync:
$ npx branchlate@latest sync
Syncing project org/project with branch: new-feature
Branch created
🇩🇪 de located in i18n/de.json
  Added 2031 keys to the distant branch
🇺🇸 en located in i18n/en.json
  Added 2031 keys to the distant branch
🇫🇷 fr located in i18n/fr.json
  Added 2031 keys to the distant branch
🇮🇹 it located in i18n/it.json
  Added 2031 keys to the distant branch
Branch: https://app.branchlate.com/org/project/new-feature
Once synced, you can share the URL of the branch with your translators and business teams. They will see the translation keys and can start updating them directly.
When starting the sync, the source of truth is in the codebase. If updates are made in the UI (like validations or edits), the truth becomes the updated values in the UI, marked with green chips. You can learn more in the Source of truth section.
5. Translating and validating
Once translators or business teams have access to the URL of the synced branch, they can begin their work:
- Validate or Invalidate translations based on business needs.
- Update translations marked as "Update needed" by the red chip.
- Once translations are validated, they will be marked with a green chip.
Instead of manually updating translations, you can use the AI-powered translation feature to fill in missing translations automatically. Learn more in the AI section.
When developers perform the next sync, any updates made in the UI will be pulled into the code, ensuring everything stays consistent across your project.
6. Live preview with the chrome extension
For projects using dynamic translation frameworks (like React or Angular), Branchlate offers a Chrome extension that allows live previews of translations on your website.
Live previews are available only for frameworks that load translations dynamically from external files. Backend-rendered frameworks (e.g., Next.js) are not supported.
To enable this feature, follow these steps:
- Install the Branchlate Chrome extension.
- Navigate to your development environment and open the extension.
- Log in to the extension with your Branchlate credentials.
- Set up the following:
- Project: Select your project.
- Network Language Pattern: This is the URL pattern where your translation files are fetched (e.g.,
**/assets/i18n/{languageCode}.json). - Branch: Choose the branch you're working on.
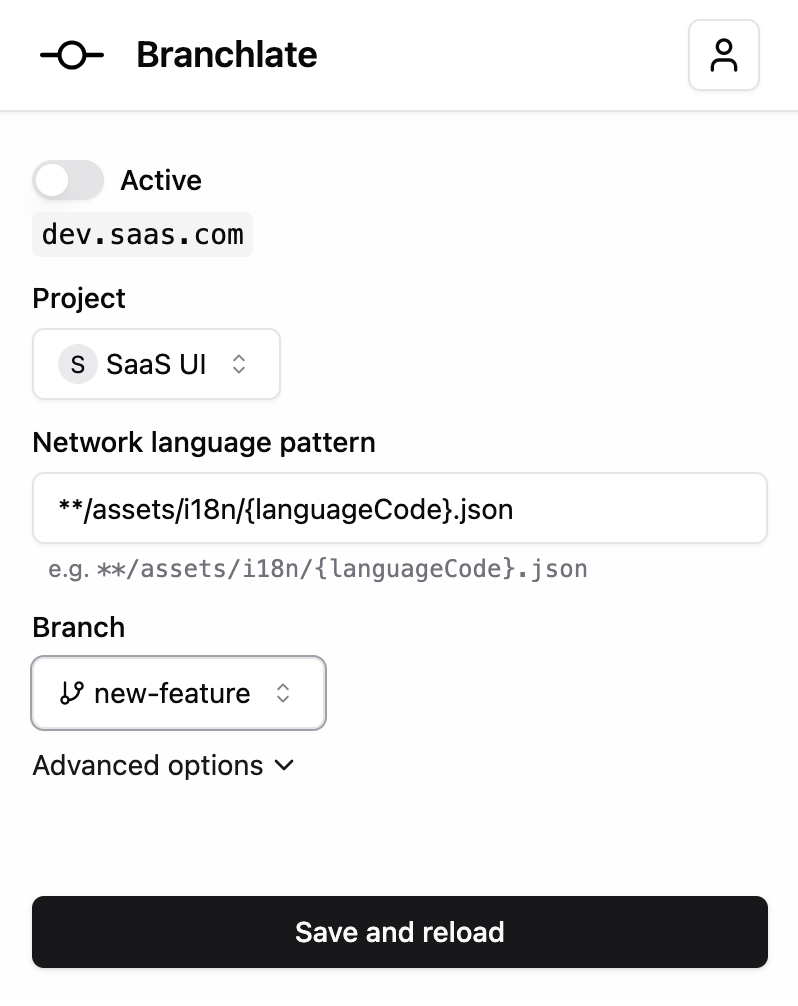
Once everything is set up, click Save and Reload to refresh the page with the latest translations injected. You’ll also see white chips on translatable elements. Clicking these chips allows you to directly edit the translations on the page.
7. What's next?
You’ve now successfully set up Branchlate, synced your translation files, and explored how to manage translations efficiently. With these basic steps, you're ready to take full advantage of Branchlate’s features, whether you’re syncing translations across Git branches, using the Chrome extension for live previews, or managing translation validation through the UI.
Branchlate simplifies translation management by integrating seamlessly into your Git workflow, allowing both developers and translators to collaborate without friction. Your translations are now synced and ready for your team to review, validate, and refine.